|
<< Click to Display Table of Contents >> Add Part to Work Order |
  
|
|
<< Click to Display Table of Contents >> Add Part to Work Order |
|
You can get to this form by either clicking on the Add Part, or Add Part from inventory.
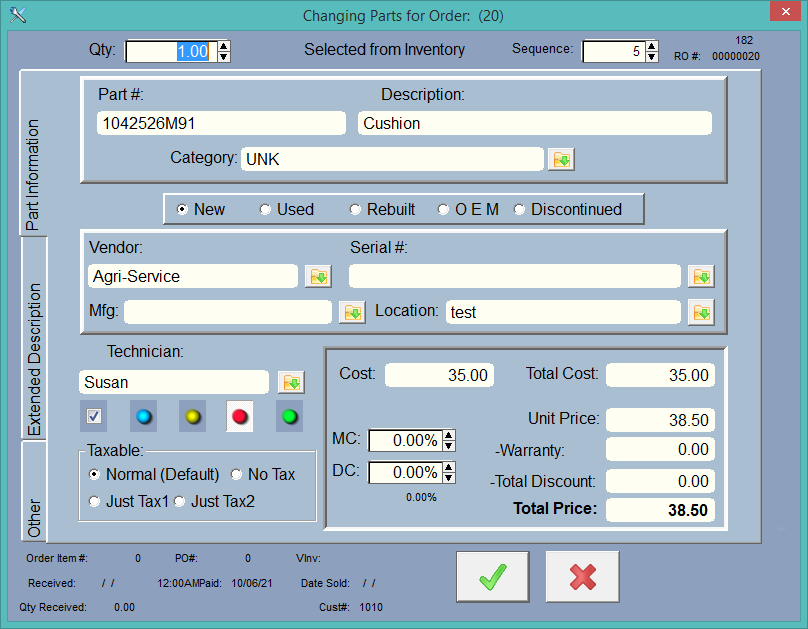
This is the RO parts editing form. Remember that everything you enter here is put into, and saved, in this estimate or WIP, but not updated or saved in any list except for this RO. It affects nothing in inventory, if at the top of the screen it's marked as 'Special Order'. That's what we call a non-inventory part. We are simply adding this item to the work order.
If it says 'Selected from Inventory' at the top of the screen, it means that you selected an inventory part, and it was 'copied' into this RO part record. Items that are selected from inventory will update the inventory quantities when transferred to a Work in Progress (WIP), and when completed.
For instance, let's say we had an inventory item with a quantity of 5. We select 1 of this inventory item to be added to the work order. If it is an estimate, no quantities are changed in inventory. If it is a WIP, then the Quantity in inventory is reduced by 1, and the quantity on hold is increased by one (in the inventory (or Parts List ) record. Now, when we transfer it to completed, the Quantity on Hold in the original inventory record is decreased by one.
(But really you don't need to think about it much, the program handles everything for you.)
At the top of the screen you adjust your quantity. To the right of that you'll see a number for this RO, then there is the order number. This is the order that this part is displayed in the parts list for this RO.
Category, Vendor, Mfg, Serial#, and Technician must be consistent, so just use the lookup buttons ![]() to display the lookup for that item and select from the lookup.
to display the lookup for that item and select from the lookup.
Note: If you have Vendor, Serial#, and MFG turned off in the company setup area, you will not see these fields display.
After you enter the cost you can use the markup feature to the right by clicking on the arrows. Depending on your company setup, the program will markup by Margin or Percentage.
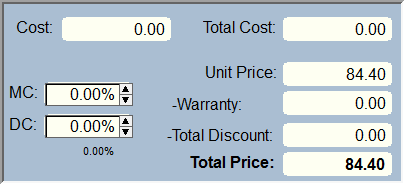
MC is for the Markup Calculator. It will always show zero when the screen is first displayed. It is there to help you create a markup percentage/margin for the unit price. If the MC is zero, you can type in anything you like for the Unit Price.
Warranty - To apply a warranty to this item, just type in the amount of the warranty. You can click the '-Warranty' which is secretly a button that will apply the total price to the warranty. So above, if you clicked '-Warranty', it would fill lin the warranty with 84.40, subtracting it from the unit price and the Total Price would be zero. If you right click on '-Warranty', a calculator will display so you can figure a percentage. If you do have a warranty amount in any part in the RO, when you complete the RO there will be a claim created for each part.
DC is for Discount Calculator. This helps you create a Total Discount using a percentage. Total Discount is created from the Unit Price multiplied by the Quantity to create the Total Price. If you go back in and change the Quantity you will probably want to change the discount. The current discount percentage is shown below the Discount Calculator field. You can right click on the DC field to 'paste in' the current discount percentage.
Parts Status Lights
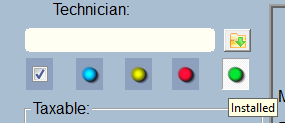
Normally when you bring an item in from inventory, the Check will be selected. However, you can edit the RO Part once it's in the RO, and change the status light to Blue (Pulled), Yellow (On the Shelf), Red (Taken), or Green (Installed). You can change the meaning of these lights in Company Setup under Other Settings/Custom User Lists.

Note: Be careful of changing the meaning if you've been using these lights already or it could be confusing.
At the bottom on the left there is the Order information which comes from the purchase order, if you added this item to a PO while on the Repair Order screen. See more in Purchase Order.
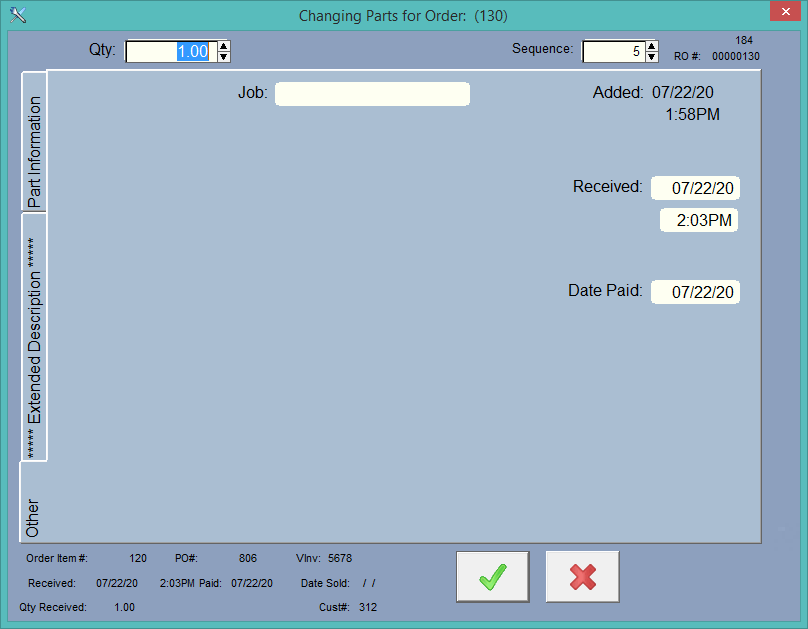
The job is automatically filled in if you are using the Jobs Feature in the RO.
Dates Explained
There are several Dates. In the upper right there is the Date and Time Added. This is the moment this item is added to the RO. It is also filled in if you sell something in the Point of Sale. The purpose of this date is to get a report from Browse all Part History so you can see what parts are being used during a set period of time. So, for instance, if you want to find out all of the parts that were added to RO's today, you can get that information. That way you can use it to check inventory.
Received date comes from the Purchase Order. If you create a PO using a part from this RO. Once the part is placed on order in the PO, the Order Item#, PO# will appear here at the botton. Once you receive the item in the PO, the Received Date and time get filled in.
The Date Sold is when the RO gets completed.
The Date Paid is a special date. If you have a long running invoice and you are getting multiple payments on this RO, then when you add a deposit, the program will go through all parts in the RO and fill in the blank Date Paid fields. You can then actually sort all of the parts in this RO by Date Paid and part#, which will then show in that order on the invoice.
Click on the Check to save the part, or the X to cancel the editing and not save.