|
<< Click to Display Table of Contents >> Jobs |
  
|
|
<< Click to Display Table of Contents >> Jobs |
|
Assigning jobs in an RO gives you a way to print out an invoice (only one at this writing) that will list the items in a job starting with the labor items, then the parts and special items, then the next jobs labor items and the parts and special items, etc.
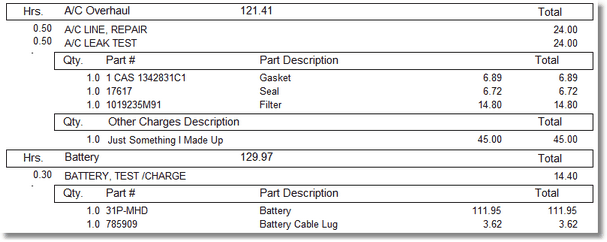
(Actual part of the Job Invoice Printout)
Assigning Jobs is of course a bit more work, but it's not hard once you figure it out (like anything else, right?)
Start with an RO and add at least two labor items, and about 4 parts, some parts should relate to each of the labor items as an example.
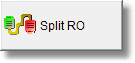
Now, click on the Spl it Button . See how I did that, I split the word split. I crack myself up.
It is called the split button as it is also used to split an RO by canceling items. See the Split Repair Order Section.
After you've clicked on the split button, at the bottom of the screen the Job Transfer Button will display ![]()
If you drag and drop an item onto this button it will simply mark the item as canceled. To use it as a Job assignment button, click on it once, above the labor items there will now be an entry field where you can type in a job name. While it is only 20 characters max, try to make it meaningful.
If there are other jobs already on this RO, they will display here. Just click the down arrow to see more jobs. Type in a new job name. Then grab a labor or part item and drag it to the Job Transfer button, which will have now changed to the name of the job.

When you select a different job or type in a new job name, this button will display the job name you are transferring items to. To un-transfer it, just drop the item again onto the job of the same name. Notice that the icon next to the part changes to a Job Icon. ![]() Also, if you move your mouse cursor over the top of the icon, it will display the name of the job for that part or labor or special item.
Also, if you move your mouse cursor over the top of the icon, it will display the name of the job for that part or labor or special item.
![]() Notice the job icon is also to the right of the Job Name Entry. If a job is selected, click on that button and it will only show items for that particular job. Click on the Show All button at the bottom of the screen to see everything again. If you want to see all the items that have not been assigned a job, erase the job entry field (You can right click on it or just erase manually), then click on the Job Icon to the right. Again, click on the 'Show All' Button at the bottom to see everything.
Notice the job icon is also to the right of the Job Name Entry. If a job is selected, click on that button and it will only show items for that particular job. Click on the Show All button at the bottom of the screen to see everything again. If you want to see all the items that have not been assigned a job, erase the job entry field (You can right click on it or just erase manually), then click on the Job Icon to the right. Again, click on the 'Show All' Button at the bottom to see everything.
Note: Because the totals now are totaled for the selected Job in the RO, if you save it like this, you will save those totals. When you open the RO back up again, it will recalculate the totals correctly.
Another thing you can do is right click on the job icon ![]() and you can erase all job names for all parts.
and you can erase all job names for all parts.
There is only one job invoice at this time. The job invoice printout is unusual because it actually figures out the names of all of the jobs in the invoice, then prints each job (labor, parts, special) out one at a time. When the report creates the job list, it looks at the labor items first, so the order of the labor items determines the order of the jobs.
Splitting RO's by Job
Sometimes you might want to split an RO up into multiple RO's so you can do certain Jobs later. So as to NOT clutter the main browse screen, you highlight the RO in the RO Browse, then click on the 1 Customer History tab. There, 3 buttons will display:

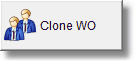
With these buttons you can move jobs back and forth from one RO to another, split the RO's, etc. It is highly suggested that if you split an RO, you 'Unite' it back to the RO you split it from. If you want to play with it, Clone an RO first, then you can try splitting it up.
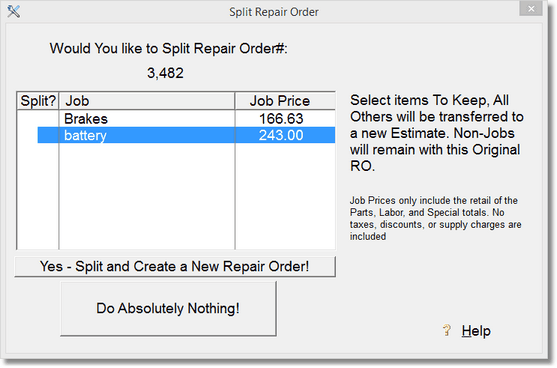
When splitting an RO, highlight the jobs you want to keep in the current RO. Everything else will get transferred to a new RO. The items (parts, special, labor) that are not assigned a Job Name will not get transferred but will remain with the current RO. You may highlight many jobs, so in the above example if I highlighted both Brakes and battery, they would be kept, and nothing would get transferred to the new RO. Simply click to highlight, click again to un-highlight.