|
<< Click to Display Table of Contents >> Work Order Labor |
  
|
|
<< Click to Display Table of Contents >> Work Order Labor |
|

You may add a labor item directly to this work order by selecting ' Add Labor - One Time', or, if you have a labor list, simply select the 'Add from Labor List' button.
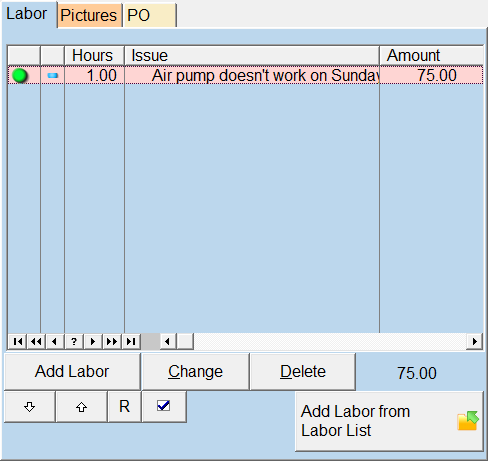
The browse labor screen looks like this:
You can have the labor show and print in order. Click on the up or down arrows to move an item up or down in the list. Sometimes you may have to renumber them, they renumber by 10's... so you can add a labor item in the middle.
Also note the Red or Green light (icon) on the left. Read more about what these mean in Setup - Other Settings. Green means you billed more hours that it took, Red means you took more hours to complete than you billed for.
There are also icons (Lights) in the second column. These indicate if you have Started or Finished this labor item.
•A blue dash means no dates or times have been filled in.
•A blue folder means the Due date/times are filled in, but not yet overdue.
•A Yellow light means the Start Dates have been filled in, so the job has been started.
•A Red light indicates the Due date/times have been filled in and the job is overdue.
•A Green light means the completed date/times have been filled in and the job is completed.
Due Dates and times aren't required. Just right click on the item and you can fill in the Start or Completed times. Or edit the item and click on the 'Times' tab.
Hover your mouse above the lights and it will display the dates and times.
Tricks and Tips
If you want to delete all items in the above labor list, right click on the Delete Button. A question will display asking if you would like to delete all of the labor items.
Right Click on the ![]() to open the labor screen wider. Right click on it again to make it the normal size. This may help you visually when adding a lot of labor items.
to open the labor screen wider. Right click on it again to make it the normal size. This may help you visually when adding a lot of labor items.
If you highlight a labor item then click change (or just double-click on it), you'll see a number in the top right corner... this is an order#, not like placing an order, but the order of the record in the displayed browse table. That is what the up and down arrows and the ReNumber buttons are for, to change the order of the records. They will also show up in that same order when printing the invoice.
If you right click on the R for Renumber, you can renumber the labor items by Description, Category, Technician, Job/Canceled, or None. None just leaves it the way it was.
You can right click on a labor item and a menu will display:

This allows you to Set the Start Date / Time to now or the Finish Date / Time to now.
Creating a browse layout to see the Issue First
The other thing right click allows you to do is change your list format. This was needed because we moved the 'Issue' to the first screen of the labor form. However, we wanted to be backwards compatible and leave it as is for those that are not going to use the Issue entry. If you click on List Formats, you can add a Issue Format so the issue will show up first. Here is an example.
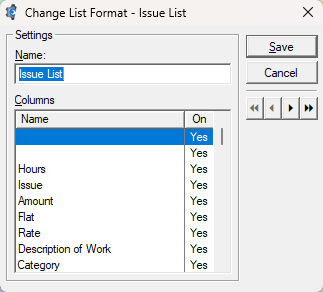
Once this is setup, you can right click and go to the Issue List and the Issue willl show up first.
To change back, just right click, List formats, and select Default Format.