|
<< Click to Display Table of Contents >> Rentals |
  
|
|
<< Click to Display Table of Contents >> Rentals |
|
To use Rentals, you'll need the Point of Sale as it is part of the POS screen. If you opted for rentals and it is turned on in your software, you will see a Rental Tab.
A quick note about rentals...
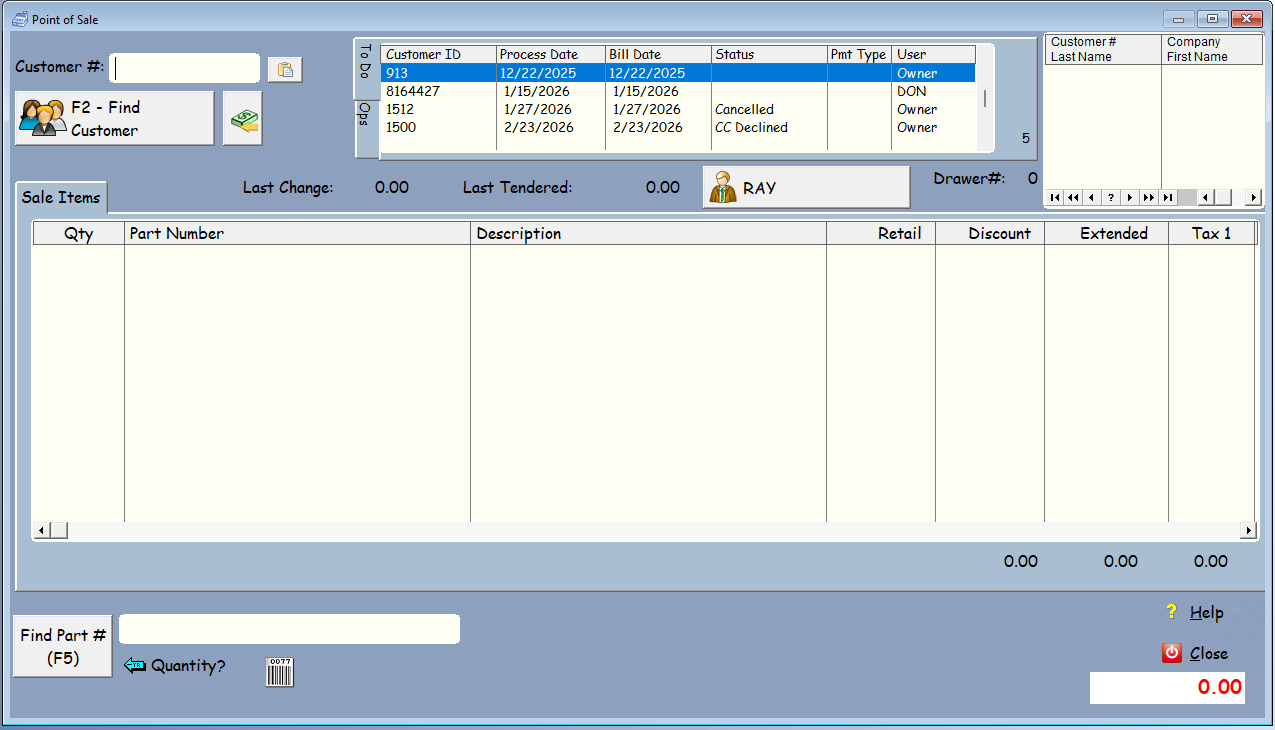
You'll see that you can create a to-do list to generate a list of the rentals you need to process. This feature is primarily designed to help you process payments as you go. For instance, if you have a check or the customer’s credit card information and need to process it manually, the list will work great for you. Once the transaction is processed in the Point of Sale, that customer is automatically removed from the list (because the processing date is changed to the next processing date).
The other way you might be processing the money, is to have subscriptions setup in your paypal account or your credit card account, and the money is processed automatically, and you are just processing invoices that have been paid at this point. This is what we do here at VMT Software. However, you can still create a list and again, after you've processed the rental, it will be deleted out of the list, even if you don't use the list to select the customer. This way you can see if someone didn't get processed in your payment system.
In most payment systems, each customer has a unique identifier ID of some kind. We now have a place to store that External ID in the customer record. For instance, in Paypal, we are using the Paypal customer Email. You can copy it (ctrl-C), then right click on the little paste button that shows to the right of the customer ID. The POS will lookup the External ID, then return the customer ID for you, and select that customer for processing.
Learn more about the ToDo lists here.
At this point in time, the recurring rentals are for one month. You can optionally set it up to pro-rate the item so it charges for the rest of the month, then resets the rental item to the day of the month you've chosen in the rental.
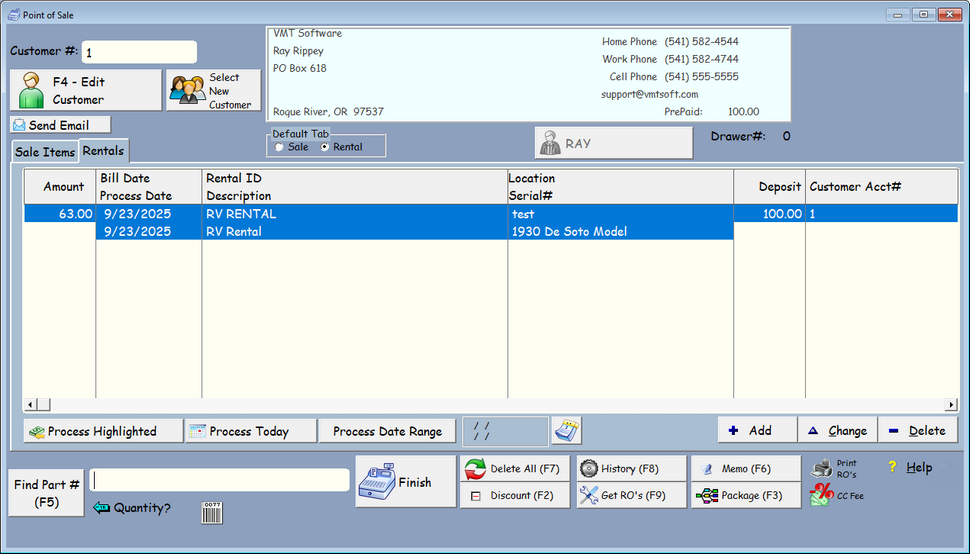
Rentals stay on this screen until they're deleted or returned, when the customer is no longing renting the storage space or whatever recurring rentals you have going on. This is great for monthly subscriptions as well. We are using it for our subscriptions at VMT Software.
When you are ready, you just click on Process, Process Highlighted, or Process Date Range. If the Process date is different than today, you'll usually highlight the item, and Process Highlighted.
Processing doesn't change the rental item. That happens when you complete the transaction. Process just moves the item to the Sales Items screen so you can complete the transaction. It will take you to the Sale Items screen immediately. If something is setup incorrectly in the rental, you can just delete the items from the sales screen, go back to rentals and fix them, then reprocess.
You could change your mind at this point, delete the item and go change the rental item, then process it again. Once you complete the transaction, the program will change the rental billing date to next month, and the processing date to next month.
You can add a rental by clicking on the add button when you're on the Rental Tab. You can also just add a pre-made package and it will add the default rental values for you, which you can change.

This should be fairly self-explanatory. Bill Date, Process Date, Rental ID are the only fields really required. You can use the calendar buttons to bring up a small calendar so you can select a billing date or a Process Date. Process date is the day you are normally going to process this rental. The button next to the calendar will automatically use the billing date to calculate the next processing date for a weekday, skipping the weekends.
Bill Just Once can only be used once. This is good for any items they have to purchase when they first get set up. After it is processed and finished, it will delete this item from the rental screen (tab).
Rental ID is the item in your inventory. This is required. When you select using the ![]() icon from inventory, it will bring in the retail and wholesale prices. Above that is the Get Price from Here which let's you override the pricing from inventory.
icon from inventory, it will bring in the retail and wholesale prices. Above that is the Get Price from Here which let's you override the pricing from inventory.
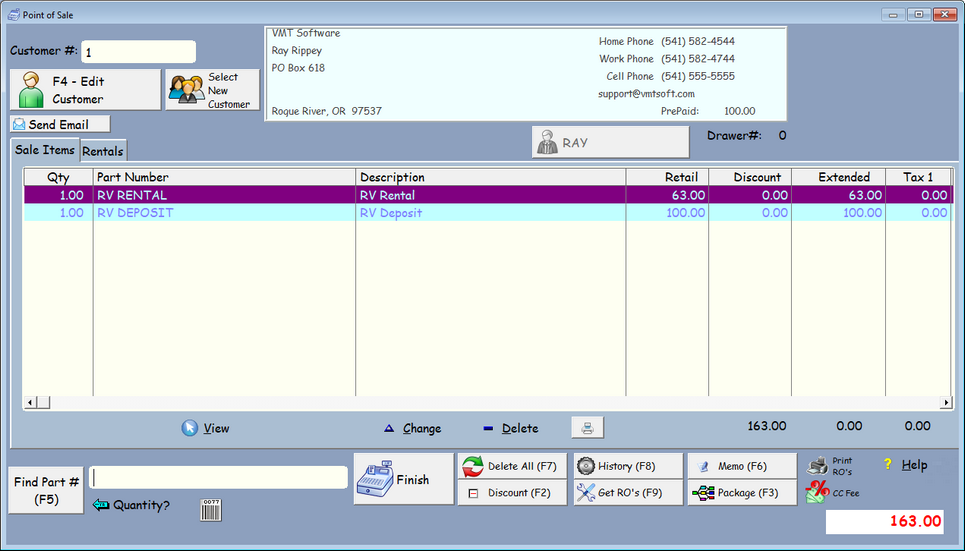
Deposit must also have an inventory part so it can be put on the screen as a line item. Once the transaction is completed, the deposit will be checked as done so it doesn't happen again for this rental. However, we need the deposit amount so we can know how much to return or apply to the customers account.
Adjust billing to Day: is the day of the month to pro-rate to. Let's say you want all of your billing to happen on the first of the month. Type in a 1 here and the next billing date will be on the first of next month. The Amount per Day is how it figures the pro-rate amount. ProRate Done is checked after the first transaction is finished so it doesn't happen again.
Location is selected from the location lookup. Each rental could use the same inventory item, and select different locations. Or, you could use different inventory items. Using different inventory items leaves a nice history of who "purchased" that inventory item and how much it is bringing in.
Vehicle# is selected by using the ![]() which looks up the vehicle or unit from the vehicle/unit master file. This will bring in the data for the serial# (usually year make and model). You can override this here and type in anything you like in the Serial# field. It will show up in the invoice printout if that printout supports the serial# field. If you're just renting a storage unit and you don't know or care what is being stored, then there's no reason to fill out this information.
which looks up the vehicle or unit from the vehicle/unit master file. This will bring in the data for the serial# (usually year make and model). You can override this here and type in anything you like in the Serial# field. It will show up in the invoice printout if that printout supports the serial# field. If you're just renting a storage unit and you don't know or care what is being stored, then there's no reason to fill out this information.
The More Tab
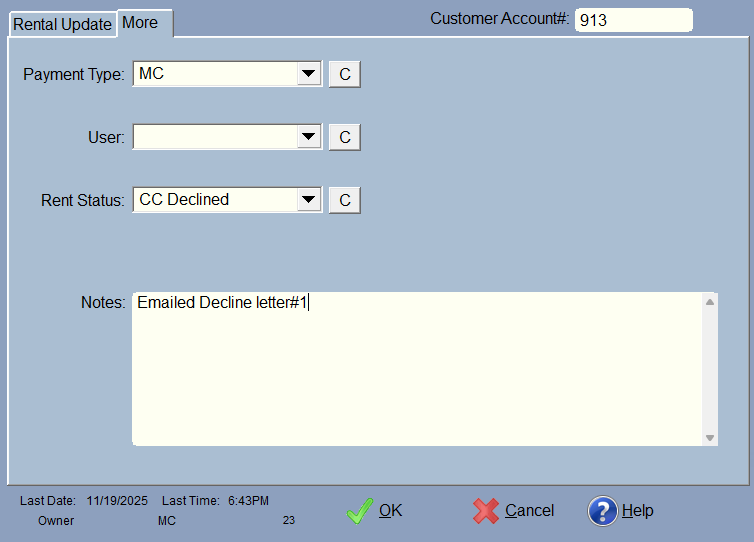
•If you have users setup, then the user will be stored after the rental is processed, or you can select the user here. This helps with the process filters on the first POS screen. The User will stay this way until you change it.
•Payment Type is a drop-down where you can select the type of payment. This comes from the payment types under Credit card setup. You could add check or cash in there as well. This helps you filter by the payment type(s). Payment type stays set for the next scheduled rental.
•Rent Status: This is great for tracking customers you may need to call to get a different payment. The drop-down is created in Company Setup, Other Settings, Custom User List. Just select the Rental Status drop-down so you can add your own rental status. Once you process the transaction, the Rent Status is zeroed and it won't be there for the next rental process.
•Return Daily charge amount is for pro-rating upon return of a rental. If you don't want to return anything, leave it at zero. Otherwise figure your daily amount. Return Days lets you add a grace period so to speak before you start charging the daily amount. If the number of days between the billing date and today's date is greater than the return Days, it will pro-rate. So if they are only 2 days late, and you have a 5 in Return Days, it will not try to Pro-Rate the return, and leave it at zero.
•Notes are stored in the notes in the invoice when you process the rental and complete the transaction. They are then erased in the rental, but still stored in the resulting invoice for history purposes. This is great to keep track of when a transaction didn't go through, so you can call the customer, email them (which can be done from the Point of Sale Screen).
Press OK to save.
The other way to add a rental is to select a Package. On the rental tab there is an Add Package button. Click that and it will let you select a package. You need to make packages first in the Rental Packager.
This is much easier than adding rentals to each customer manually. Once a package is selected, you can modify the rental to suit your needs.
Once the transaction is completed. The rental billing date and process date will change to the next month. If you are pro-rating for the first time, it will change the date to the (first in most cases) of the next month and the pro-rate will be marked as done so it doesn't happen again.
The processing date will change to the first weekday if the billing date is on the weekend.
Deposits will be zeroed out, as they are a one time thing. The deposit money will be added to the security deposit for the customer, and will need to be returned or transferred to Pre-Pay once the rental has been deleted.
"Bill just once" items will be deleted from the rental file so it will not happen again.

Creating the List

To create the list, select an option, then click Compile ToDo. That's it. The list will be created and the ToDo Tab will be selected. Normally you'll pick Today and Earlier. Click on the calendar icon to select a range of dates. This is nice if you want to process for the next few days or week, for instance.
There is are filters here. You can select a status, a user, a Pmt (payment) type, or all, and click on the F (for filter) button. The 'F' Button will take you back to the ToDo Tab, so to select both, you'll have to go back to the Ops Tab. C Clears the selection and the filter.