|
<< Click to Display Table of Contents >> Point of Sale |
  
|
|
<< Click to Display Table of Contents >> Point of Sale |
|
This is the Point of Sale Screen, also referred to as the POS screen. You can also do Rentals from this screen. Click here for more information about rentals.

Here is a YouTube Video:
Point of Sale
Here is another YouTube Video that is more recent:
Newest Point of Sale Video with Detail
If you see this as part of the screen on the top:

This is for the rentals option only. Click Here to see more information.
The Point of Sale screen is very simple to use. It is designed to sell parts to a customer, and print an invoice.
First, you might want to change the User if you are not the current user. When you first run the Point of Sale, if there are Users, you will be asked to sign in. Click on the User Button ![]() to change to a different user. If you walk away from the computer and want to make sure nobody uses you as a user on the next transaction, just click on the User button.
to change to a different user. If you walk away from the computer and want to make sure nobody uses you as a user on the next transaction, just click on the User button.
If you know the customer number, you can simply type it in (then press enter).
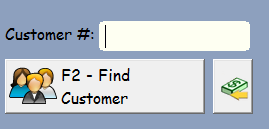
If you have the customers ID in the Windows Paste Buffer (you've done a Ctrl-C to copy it from somewhere else), you can click on the paste button to display and select that customer.
If you have the customers External ID in the buffer, you can right click on the paste button, and the customer ID will be found for you automatically. You will of course had to have previously added the external ID to the customer record.
If you don't know the customer number, you will need select a customer by clicking the button  in the upper left corner of the screen, or pressing the F2 Function key.
You can also select the cash button, which will select a cash customer if you have previously defined a cash customer in the Company Setup.
You will be shown the customer lookup screen. This is the same screen you use in Digital Wrench to find or add customers.
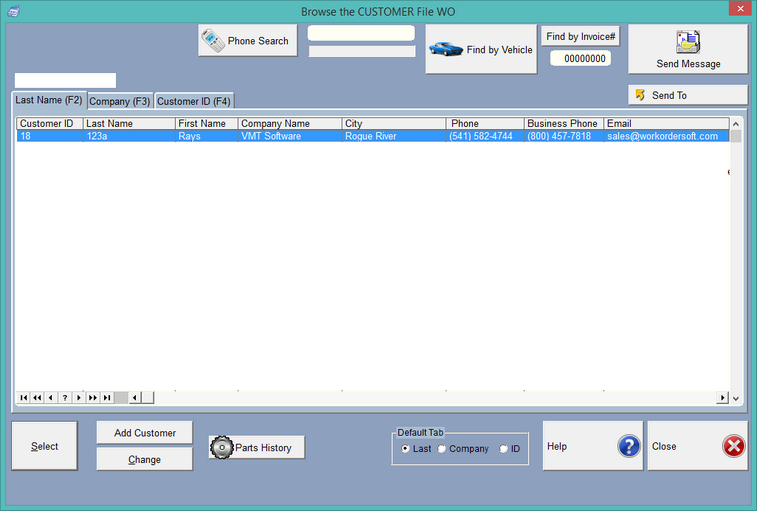
From this screen you may search for and select a customer, or add, then select a customer.
Once you've selected a customer, you will see the following screen. Click here for more information about rentals.

Note: The Delete All (F7) ![]() button will let you delete all items off of the screen, then take you back to the field where you enter the customer ID. You can also delete items one by one, or double click on them to change the price or quantity. Delete all also works if you're on the rental tab.
button will let you delete all items off of the screen, then take you back to the field where you enter the customer ID. You can also delete items one by one, or double click on them to change the price or quantity. Delete all also works if you're on the rental tab.

To add a part, you can simply type in the part number, then press enter. You can also scan the barcode with a barcode scanner. The barcode scanner should press enter for you. If it does not, you will need to program your scanner. If you have the Quantity ![]() depressed, you will be able to enter a quantity after you type in the part number or scan the barcode.
depressed, you will be able to enter a quantity after you type in the part number or scan the barcode.
If you would like to enter a quantity after you've scanned the barcode, typed in the number, or look for the part by using the F5 key, simply press the Quantity button. After you select the inventory item, the program will then ask you for the quantity.

You can use the arrows to select a quantity other than one, or just type in the quantity.
If the UPC button ![]() is depressed, the program will look-up the UPC number in the inventory instead of the part number.
is depressed, the program will look-up the UPC number in the inventory instead of the part number.
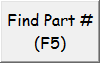 F5 - Find Part - If you want to simply look-up a part, press F5 or click the Find Part# button. This will bring up the standard inventory lookup screen.

Note: The Default Lookup... you can set it to remember how you look-up parts.
Once the parts are on the screen, you can edit each part by double clicking on it, or clicking on the part the click the Change button.
(You can also set up the 'Super Lookup from POS' in Company setup under 'Each Computer'. This gives you the actual complete inventory browse screen which will give you many more functions.)
![]() F2 - Apply Discount. You can apply a discount to every part on the screen. (Not Completed Invoices)
F2 - Apply Discount. You can apply a discount to every part on the screen. (Not Completed Invoices)

(Type in or use the arrows to adjust the discount percentage)
![]() - Change a part on the Point of Sale Screen
- Change a part on the Point of Sale Screen

Note that the discount percentage is 10%, although the field with the arrows shows zero%.
That's because it is really a calculator. Just type in something new to change the discount.
Here is also where you would add shipping. It will be added to the shipping totals in the resulting invoice.
![]() F8 - Parts History
F8 - Parts History
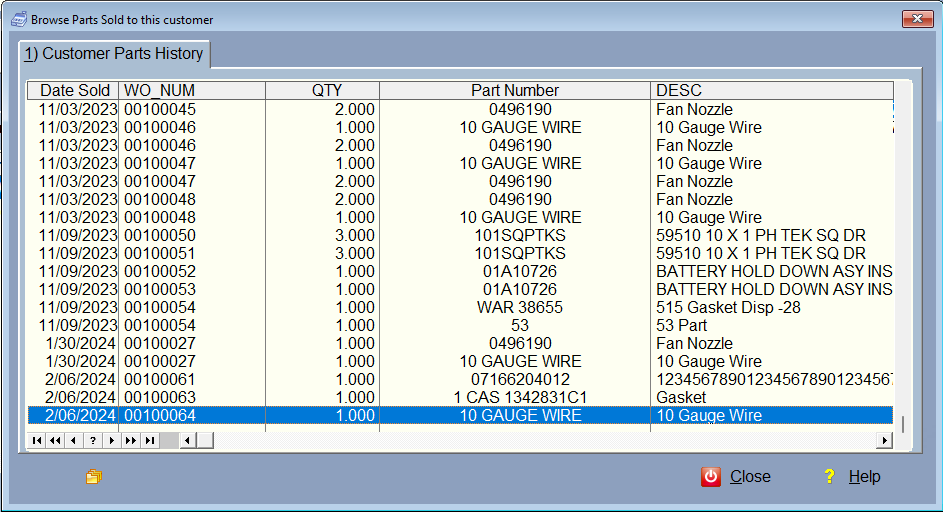
This screen shows every part the customer has ever purchased. They come from all Invoices in the system. If the date sold is blank, it indicates a repair order that has not been finished.
You can sort the screen by clicking on the header, like Part Number or Date Sold for instance. You can drag an item to the ![]() button and view the invoice that item is attached to. If the item has had zero money paid on it, and you haven't restricted it in security for editing, you can edit the invoice. If you have the completed invoices on the screen already, you should edit them using the right click, not the history. Instead of dragging and dropping, you can click on the
button and view the invoice that item is attached to. If the item has had zero money paid on it, and you haven't restricted it in security for editing, you can edit the invoice. If you have the completed invoices on the screen already, you should edit them using the right click, not the history. Instead of dragging and dropping, you can click on the ![]() button on the history screen, then right click on the Get RO's button.
button on the history screen, then right click on the Get RO's button.
You can also use Drag and Drop to select a part from history, then drag it to the F5 Find Part button , and it will be added to the Point of Sale Screen. This way you can add parts that the customer purchases on a regular basis. Another way instead of Drag and Drop is to click on the pick Icon ![]() . When you click on it, the history screen will close. Then you can right click on the F5 Find Part button and the item will be added to the Point of Sale screen, just like the Drag and Drop feature. This works well if you don't like the Drag and Drop, or if the latency is high on your network.
. When you click on it, the history screen will close. Then you can right click on the F5 Find Part button and the item will be added to the Point of Sale screen, just like the Drag and Drop feature. This works well if you don't like the Drag and Drop, or if the latency is high on your network.
![]() Get Invoices/RO's - If there are repair orders that have outstanding balances, and they're completed, you can press the Get Invoices button and qualifying RO's will display with the Invoice# instead of the Part number, and the year make and model will display in the description. You can scroll to the right and see the item is marked with an 'I' for invoice. Don't worry because you will not see taxes on this screen. The taxes are taken care of within the work order/Invoice. You will also not be allowed to make a partial payment, or split transactions when paying for RO's/Invoices from this screen.
Get Invoices/RO's - If there are repair orders that have outstanding balances, and they're completed, you can press the Get Invoices button and qualifying RO's will display with the Invoice# instead of the Part number, and the year make and model will display in the description. You can scroll to the right and see the item is marked with an 'I' for invoice. Don't worry because you will not see taxes on this screen. The taxes are taken care of within the work order/Invoice. You will also not be allowed to make a partial payment, or split transactions when paying for RO's/Invoices from this screen.
However, you may now edit the invoice if no payment has been made. You can right click on the yellow invoice and then you may edit, depending on the amount paid (must be zero), and your security settings. This works well if you are going to remove the credit card fee or add one, as it needs to be adjusted in the invoice itself. Click on the 'View Invoice' in the right click menu.
![]() Enter a Memo. This memo will be stored in the invoice/RO that is created when you finish. You can edit it at anytime before you finish the transaction. There are 1000 characters available.
Enter a Memo. This memo will be stored in the invoice/RO that is created when you finish. You can edit it at anytime before you finish the transaction. There are 1000 characters available.
![]() Package pricing is available in the Point of Sale. Note that if there are any labor items or Other Items in the package, they will be ignored, but the parts will be brought in.
Package pricing is available in the Point of Sale. Note that if there are any labor items or Other Items in the package, they will be ignored, but the parts will be brought in.
![]() This is more of a toggle than a button. If it is depressed (On), when you complete this POS transaction, any RO's brought in by the Get RO's button above will be printed.
This is more of a toggle than a button. If it is depressed (On), when you complete this POS transaction, any RO's brought in by the Get RO's button above will be printed.
![]() This is also a toggle. If depressed, it will add a credit card fee that was setup in Company Setup to this invoice when completed.
This is also a toggle. If depressed, it will add a credit card fee that was setup in Company Setup to this invoice when completed.
 Finish - Now that you've selected the parts you're going to sell to the customer, just press enter on the part entry field, or click finish. You will then be taken to the standard "Tender Screen" where you can pay for the invoice.

You can click the buttons next to the Cash, Check, or Credit Card Tendered fields to help you with the amount tendered. Be sure the change is not a negative number or it will be charged to their account.
Let's say they gave you 150 cash, you can type in 150 in the cash field, then click the button next to the check field and it will figure out the 158.20 for you. This makes it easy to split the transaction amount. (transactions cannot be split when paying on completed RO's). If you wish to pay a partial payment on a previous RO, go into Digital Wrench to the Work Orders with Balances Screen.
Click Complete Payment.
Now, the program will create an actual invoice exactly like an RO. You will be able to find it under invoices in the main work order section of Digital Wrench. All the money will go to the cash and transaction files as if it were a standard Repair order, and the parts will be taken out of inventory.
If you have depressed the Print RO's button ![]() then if you are paying off completed RO's/Invoices, they will print just like you have them setup to print when printing from the original RO.
then if you are paying off completed RO's/Invoices, they will print just like you have them setup to print when printing from the original RO.
Company Setup for the Point of Sale
In company setup, under Printer, you'll also be able to override the invoice that gets printed from the Point of Sale, and setup a different printer for the Point of Sale.
In the company setup, under each computer, you can setup your cash customer.
You can also determine if when you select a completed Repair Order to payoff, if it gets printed or not. (you can override this in the POS screen itself by clicking on the ![]() Toggle button. If it is depressed, it will print any RO's being paid off.
Toggle button. If it is depressed, it will print any RO's being paid off.
To get the UPC button to display, you must check the Display UPC Button in the company setup. Then, if you want it to default to finding inventory by the UPC, the check the Scan UPC in POS
