|
<< Click to Display Table of Contents >> Add Repair item |
  
|
|
<< Click to Display Table of Contents >> Add Repair item |
|
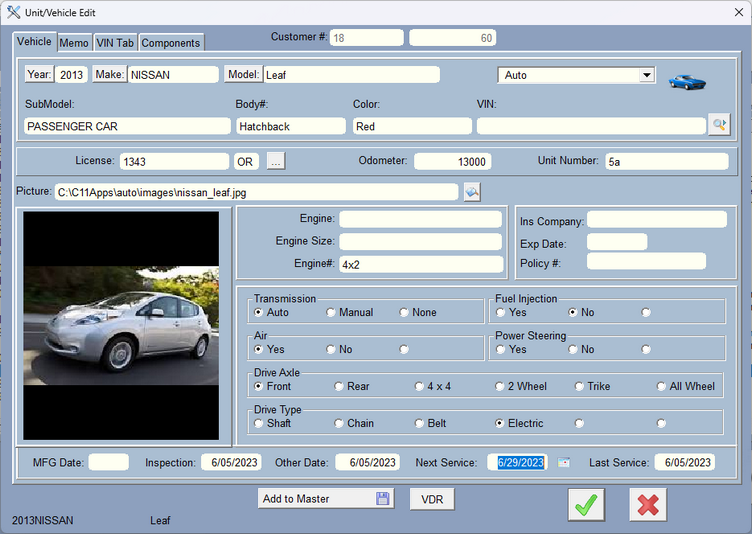
Just enter the information about the Repair Item. The more you enter, the better information you will have about the item in the future. When you're done click on the green check mark to save.
Digital Wrench is used in dozens of different kinds of repair shops. While it started out to be automobiles, we expanded into different kinds of vehicles. Now the program can create repair invoices for just about anything. In order for that to work, we made the fields you see above to be variable. Except for a few fields like Year Make and Model, the others can be changed. For instance, if you aren't going to use SubModel, you can change the name to something else. See the User Defined Fields under Company Setup for more information.
If you know the VIN, you can type or scan in the number in the VIN field. Notice the icon to the right, click on that and the program will lookup the VIN. This lookup gets data from the National Highway Traffic Safety Association (https://vpic.nhtsa.dot.gov/). If you are adding the vehicle, the Year, Make, and Model will be filled in automatically. If you are changing the record, the program will ask you if it should overwrite the Year, make and model. Once you've looked up the data for the VIN, all of the data is stored in a specially made component called VIN Data. This component has a memo that stores the VIN data. It cannot be edited so you cannot hurt it. To retrieve the data, click on the memo tab at the top. On the bottom of the screen click on the Get Data from VIN button. There is a scrolling list that will show you all of the information. There are 134 possible records of information. You can always go back and reference this. You can also assign some of these fields to fields in the vehicle/unit.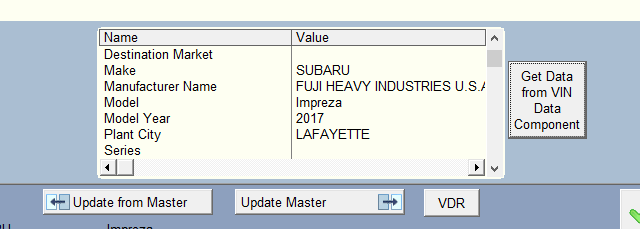
There is also a VDR button (VIN Data Retrieve) at the bottom of this screen. If the data has already been retrieved and stored from the NHTSA, this button will get it and assign fields to fields in this form (assuming you set them up in company setup).
Plate to VIN Lookup
Added: Interface to platetovin.com. This is a subscription that costs you a nickel per lookup. The company is another company altogether so you'll need to subscribe on their website, get an apiKey, and type or paste it into the company setup under Other Settings. When you use it, you'll need to type in the License Plate number AND the State, then press the icon to the right of the state field. It might take a few seconds but it should bring back year, make, and model and some other fields including the VIN. Then you can use the VIN to use the NHTSA lookup.
Field Names
If this is not a vehicle, you can turn off vehicle information in the company setup area. You may also rename the fields Vin/Serial#, License, Odometer/Hours, Unit Number, Engine, Engine Size, and Engine# to something that suits your business.
There is a drop-down to select the unit/vehicle type. For instance, if you work on both motorcycles, ATV's, and cars, you can use the drop-down to select that kind of vehicle. In the company setup you need to create the vehicle types, and select different icon's for each type so you can tell what it is at a glance. If you only service one type of unit/vehicle, you can just leave it alone.
To add a picture to the repair item click the icon to the right of the Picture field to select a picture. The program will take you to the images folder located under the wrench folder, where the program is installed. If you take pictures, put the pics (jpg's, gif's, bmp's) into the images folder.
Notice the buttons Year, Make, and Model. These allow you to lookup by Year Make and Model (YMM). If you have not created the YMM file, you can go to the Customer / Browse Master List to create the YMM File from your current Unit/Vehicle file and the Master Unit/Vehicle file.
Notice at the bottom of the screen there are several dates...
![]()
The Manufacture date is just a month and year. The Inspection Date, Other Date, Next Service Date, and Last Service Date can be made to update automatically by using the Labor Category Form when the invoice is completed. The other thing you can do here is right click on the dates Inspection, Other, and Last Service and it will be updated to today's date. There is a small calendar icon to the right of Next Service Date so you can the calendar to help you select a date.
If you have these dates updated, you can use the reminder templates to help you create a set of emails to be sent to your customers. You would use the Email Templates, and only use the Vehicle/Unit and Customer tokens for the email, then select the Customer Vehicles Query to choose for instance, the last Service date between askdate1 and askdate2.
Click on the Memo Tab to view or edit the memo
Click on the Components Tab to view Components for this vehicle.
Click on the Add to Master to add this Unit/Vehicle to the master list. Do not do this more than once per vehicle.
