* * HELP & MANUAL PREMIUM PACK 3 DEMO VERSION * *
This documentation was styled with a demo skin from the Premium Pack 3 add-on for Help & Manual. The contents of the skin are encrypted and not configurable.
This version is copyright and may only be used for local testing purposes. It may not be distributed.
Please purchase the full version of the Premium Pack to get the configurable skins and remove this notice.
This is an old screen. If you are still using this screen.. don't... quit. Go to company setup and select the normal form.
We are no longer programming for or supporting this screen.
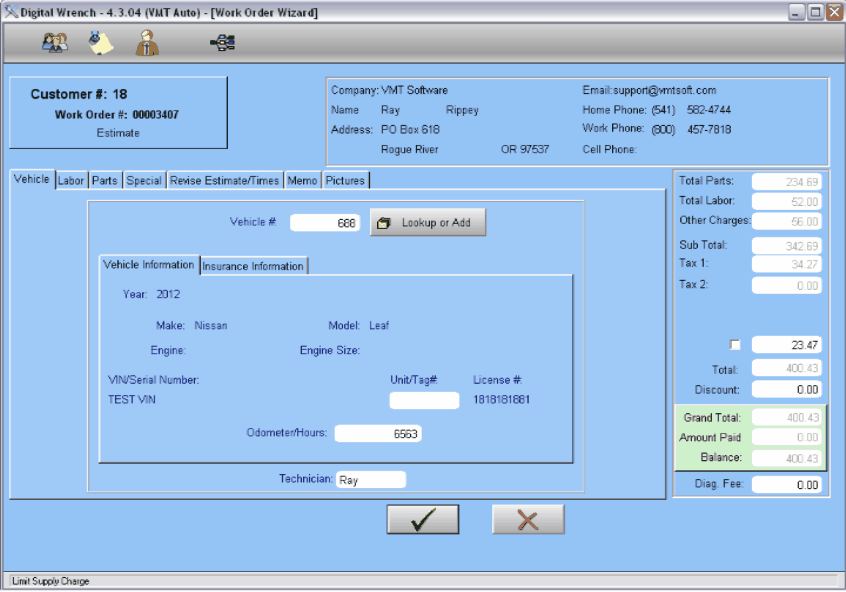
Before this screen, the program will have you select a customer for this work order.
When you select the customer, this screen will display. The first thing you will need to do is select or add a repair item or vehicle. Click on the Lookup or Add button to see the repair item selection screen. Select or add and item, then select.
Note: the item information is copied into the work order. If you change the item or vehicle in the vehicle file, it will NOT change the work order information unless you reselect the item or vehicle.
You may enter more information for the vehicle (that applies only to this work order) like Unit/Tag#, Odometer/Hours, and insurance information.
Now you may add Parts, Labor, special items, and a memo for this work order. Click on the individual Tabs...

Once you've completed adding information for this work order, click on the Checkmark to save the work order.
Note: even if you cancel, the items in parts, labor, special, revise estimate, and pictures will remain as they are in their own individual databases. The memo and totals will not be saved. It is advisable to always click on the checkmark!