* * HELP & MANUAL PREMIUM PACK 3 DEMO VERSION * *
This documentation was styled with a demo skin from the Premium Pack 3 add-on for Help & Manual. The contents of the skin are encrypted and not configurable.
This version is copyright and may only be used for local testing purposes. It may not be distributed.
Please purchase the full version of the Premium Pack to get the configurable skins and remove this notice.
Here is the form to add or change inventory items. Even if you don't actually track an inventory item, sometimes it's a good idea to add a part to the inventory so you can look it up easier and faster.
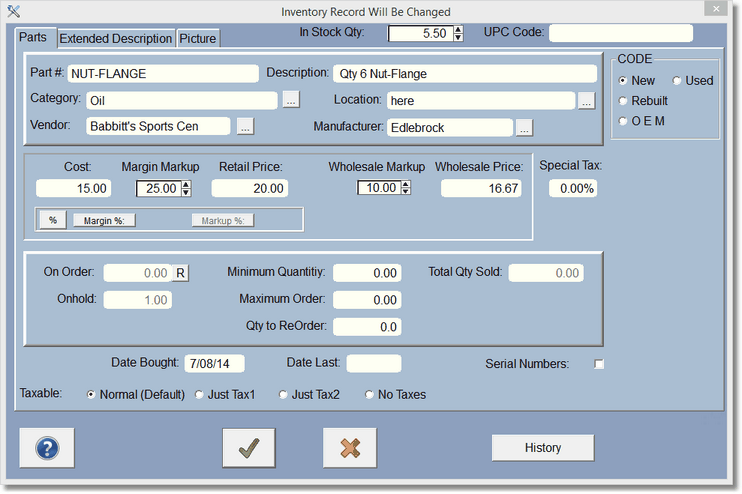
Parts that are not in inventory can be added from the Estimate or Work Order section of the program as you buy them. You can add parts that are not in inventory to this section and leave the quantity as 0. Doing this will cause the program to put the item on order when that part reaches the minimum in quantity. The plus side to doing this would be to find out what parts you are using all the time, but do not stock.
When adding items/parts to the program the first selection is Category. All parts are arranged by category to help you find them faster.
Enter the Category of the parts; like Brakes. Clicking on the box with the three dots (called an ellipse) will bring up a list of existing categories. You can add a category to this list. Categories are very important to many parts of the software.
Enter the Description of the item, cost, retail price, vendor ( who you bought it from ), Qty in stock, date purchased. Leave the date last sold blank ( the program will fill in this day the next time you sell this item ).
The next section with number sold, on order, on hold, minimum and maximum will be taken care of by the program as you order and sell items.
Click in the Code section for New, Used, etc...
Click on the Extended Description to put in anything that is not covered on this screen.
To use serial numbers, simply check the serial box, and the Serial Number button will display.