* * HELP & MANUAL PREMIUM PACK 3 DEMO VERSION * *
This documentation was styled with a demo skin from the Premium Pack 3 add-on for Help & Manual. The contents of the skin are encrypted and not configurable.
This version is copyright and may only be used for local testing purposes. It may not be distributed.
Please purchase the full version of the Premium Pack to get the configurable skins and remove this notice.
You can get to this form by either clicking on the Add Part, or Add Part from inventory.
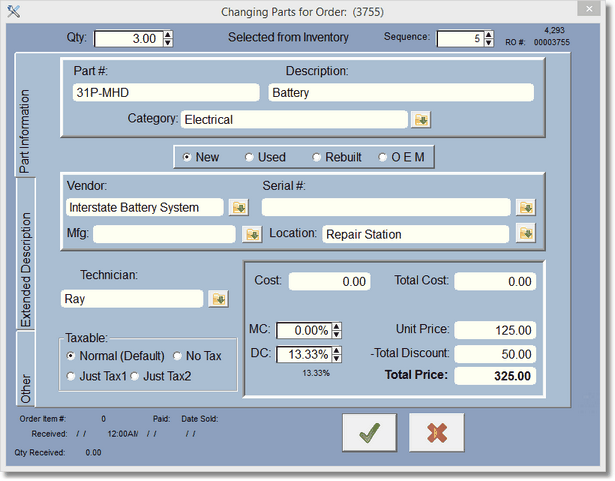
This is the RO parts editing form. Remember that everything you enter here is put into, and saved, in this estimate or WIP, but not updated or saved in any list except for this RO. It affects nothing in inventory, if at the top of the screen it's marked as 'Special Order'. That's what we call a non-inventory part. We are simply adding this item to the work order.
If it says 'Selected from Inventory' at the top of the screen, it means that you selected an inventory part, and it was 'copied' into this RO part record. Items that are selected from inventory will update the inventory quantities when transferred to a Work in Progress (WIP), and when completed.
For instance, let's say we had an inventory item with a quantity of 5. We select 1 of this inventory item to be added to the work order. If it is an estimate, no quantities are changed in inventory. If it is a WIP, then the Quantity in inventory is reduced by 1, and the quantity on hold is increased by one (in the inventory (or Parts List ) record. Now, when we transfer it to completed, the Quantity on Hold in the original inventory record is decreased by one.
(But really you don't need to think about it much, the program handles everything for you.)
At the top of the screen you adjust your quantity. To the right of that you'll see a number for this RO, then there is the order number. This is the order that this part is displayed in the parts list for this RO.
Category, Vendor, Mfg, Serial#, and Technician must be consistent, so just use the lookup buttons  to display the lookup for that item and select from the lookup.
Note: If you have Vendor, Serial#, and MFG turned off in the company setup area, you will not see these fields display.
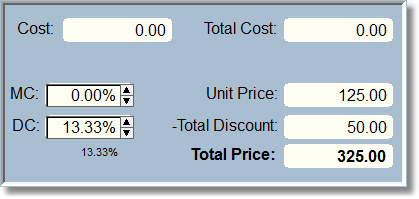
After you enter the cost you can use the markup feature to the right by clicking on the arrows. Depending on your company setup, the program will markup by Margin or Percentage.
MC is for the Markup Calculator. It will always show zero when the screen is first displayed. It is there to help you create a markup percentage/margin for the unit price.
DC is for Discount Calculator. This helps you create a Total Discount using a percentage. Total Discount is created from the Unit Price multiplied by the Quantity to create the Total Price. If you go back in and change the Quantity you will probably want to change the discount. The current discount percentage is shown below the Discount Calculator field. You can right click on the DC field to 'paste in' the current discount percentage.
At the bottom on the left there is the Order information which comes from the purchase order, if you added this item to a PO while on the Repair Order screen. See more in Purchase Order.
Click on the Check to save the part, or the X to cancel the editing and not save.