|
<< Click to Display Table of Contents >> Add Customer from Main Menu |
  
|
|
<< Click to Display Table of Contents >> Add Customer from Main Menu |
|
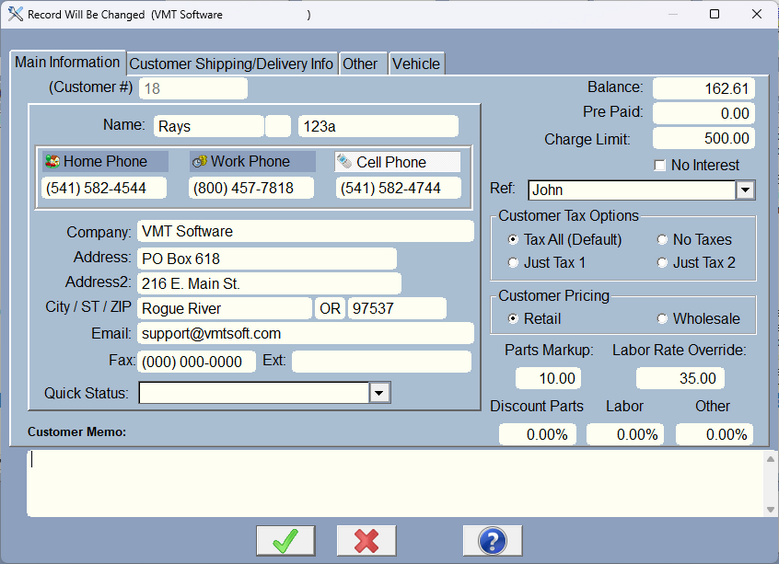
This form is used to add customers to your program. Enter all the information about the customer, name, address, etc.. The primary vehicle information is entered into this form. Add vehicle(s) by clicking on Browse or Add Vehicle button. Although you can add units/vehicles here, it is suggested you add them from the RO screen while selecting a vehicle.
Also, there are buttons above each phone number. Click on the one that will be the default phone number.
Prepaid is exactly that. It shouldn't be changed here. It is changed in the software when you overpay an invoice. You can use the Prepaid to pay on an invoice later on.
REF: is a reference, Newspaper, Radio, TV, word of mouth, etc. You can use the drop-down or type in something. You can Preset the drop-down list in Company Setup under Other Settings/Custom User List.
Charge Limit is to limit the customer from being able to have an RO completed without paying. For instance if you had a 500 work order, and your limit was 100, the customer would have to pay at least 400.
The Charge Limit button (to the left of Charge Limit) will fill in the Charge Limit with whatever you have in the Company Setup.
The Charge Limit will be filled in automatically from the Company Setup Charge Limit when you are first adding a customer record. Charge Limit has security so you can limit who is able to change it.
Security Deposit: This comes from rental deposits and works within the rental system available as an option in the Point of Sale.
Customer Taxes only work with taxes that are in Company Setup. If you don't charge a tax2, then selecting Tax2 here has no effect.
Markup can override the normal markup for a part. This gives an automatic discounted price for each part as long as there is a cost in the part.
Labor Override overrides everything if there is a value > 0.
Discount Parts, Labor, and Other automatically put those discounts into a NEW RO so Parts, Labor, Other have an automatic discount as the parts, labor, and other are being added.
External ID: this is used normally for rentals, but you can use it for whatever purpose you can think of. This allows you to have a 2nd ID and lookup the customer by that ID.
Quick Status shows up on the upper right of the RO screen in red. You can add to this list, or preset the list in Company Setup/Other Settings/Custom User List. If it's not in the list, you can simply type it in.
Any notes about that customer can be entered into this form. These notes are not printed on the estimate or work order.
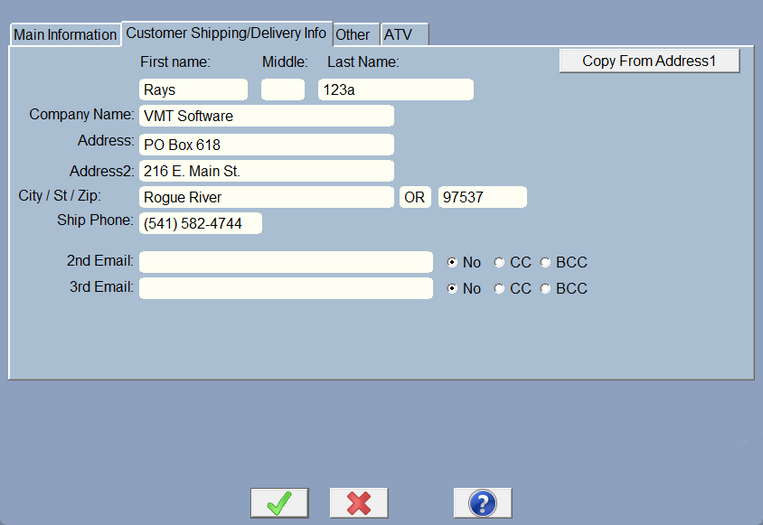
Customer shipping information can be entered on the second tab of the customer form. You don't have to enter any information if you don't plan to ship anything to the customer.
There are 2 extra Email addresses here. To make them work type in an Email address and click either CC (Carbon Copy lets the main recipient see who else you're sending it to), or BCC, the main recipient can't see this address. No simply turns it off. That way you can edit the customer record and toggle it on or off at will.

Special options here let you setup the customer for specialty items. Notify by: is the default notification when you are communicating with the customer. If you select Text, you need to put in the cell phone carrier so the program knows how to send a text message. You also have to have a cell phone number in the cell phone field (I know, right?)
The first date and last date should be filled out by the software, so leave them alone. However, only you have control over the user date, so put in anything you like. This lets you do search queries on customers. The user1 and user2 fields are also there so you can do search queries. The reason we force you to put the 'answers' in a table is so you have consistency.
The Tax Table allows you to select a completely different set of taxing rules for this customer. This is good if you have special customers that are out of state or have special tax status. You can setup these tax tables in Company Setup/Taxes and Charges/Tax Table button under the tax percentages. You'll also have to tick the Tax Table Overrides check.
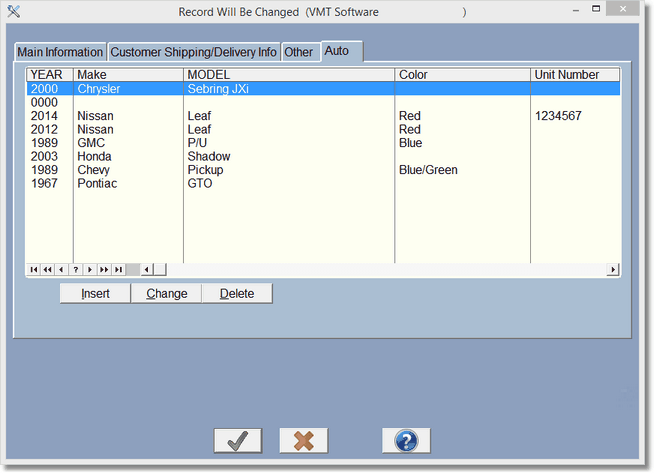
This screen shows all Vehicles/units for this customer. While you could add them here, normally you'll add them from the RO Screen when you first select a vehicle/unit for that customer.
If you would like to edit the customers ID number (not a normal thing to do), you can enter the customer form and hold the Control key down and right click on the help button at the bottom of the screen. The customers ID number can now be edited. All RO's, Point of Sale items, vehicles/units, and reminders will automatically change to the new customer ID's. Other files including the Appointments, Customer Selection, Email Lists, cash, cash history will not be affected although that may change in the future. Again, this is not recommended, it should only be used if we decide it's OK. Call first.